
Table of Contents
What will we Learn from This Blog?
We will Learn About OR Function in Excel and able to answer “how to use OR function in excel” The syntex, How to Use it, Common Mistake Around it, Advance Tips and Tricks etc. Hope so we will end the blog and Know about this Logical Function Thoroughly
Introduction
Importance of Functions in Excel
Excel is a Day to Day Go through software now in this world, to calculate, get track of previous data. Functions are playing a crucial role in Excel as they enhance the efficiency and accuracy of data analysis and manipulation. from Automating Calculations, Dynamic Updates, Error Checking To data analysis it makes our life easy.
Importance of OR Function in Excel
The in Excel OR function serves a crucial role in logical operations. It allows you to test multiple conditions and returns TRUE if at least one of them is true, and FALSE if none are true. This function enhances the flexibility of your formulas by providing a concise way to evaluate multiple criteria. It is particularly useful in constructing complex logical statements, making your Excel spreadsheets more dynamic and adaptable to varying data scenarios.
- Logical Testing: this function in Excel is used for logical testing.
- Multiple Conditions: Allows testing of multiple conditions simultaneously.
- Returns TRUE or FALSE: Outputs TRUE if at least one condition is true, FALSE if none are true.
- Enhances Formulas: Enhances flexibility by enabling concise evaluation of various criteria.
- Complex Logical Statements: Useful for constructing complex logical statements in Excel.
- Dynamic Spreadsheets: Facilitates adaptability to varying data scenarios.
What is the OR Function?
Defination
The OR function in Excel is a logical function that checks multiple conditions and returns TRUE if at least one of them is true, and FALSE if none are true.
Purpose
This function in Excel is utilized to assess multiple conditions within a logical statement. It returns TRUE if at least one condition is true, serving to streamline and enhance logical decision-making in spreadsheet formulas.
Syntex for Excel OR Function:
Syntex
The syntax for the OR function in Excel is as follows:
=OR(logical1, [logical2], …)
- logical1, [logical2], …: These are the conditions or logical expressions that you want to test. You can include up to 255 arguments within the OR function.
Return Value
How to Use:
- Begin by entering this function in a cell or formula.
- Inside the parentheses, input the logical conditions you want to evaluate, separated by commas.
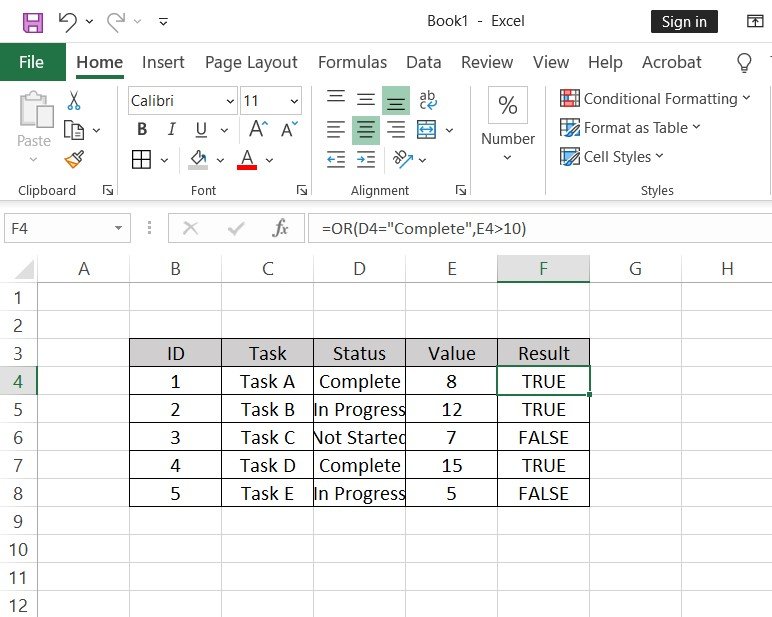
Example: =OR(D4=”Complete”,E4>10, ) - The function will return TRUE if at least one condition is true, and FALSE if none are true.
- Use the result in other formulas or logical tests as needed.
Examples with Description
lets learn this Function with Example:
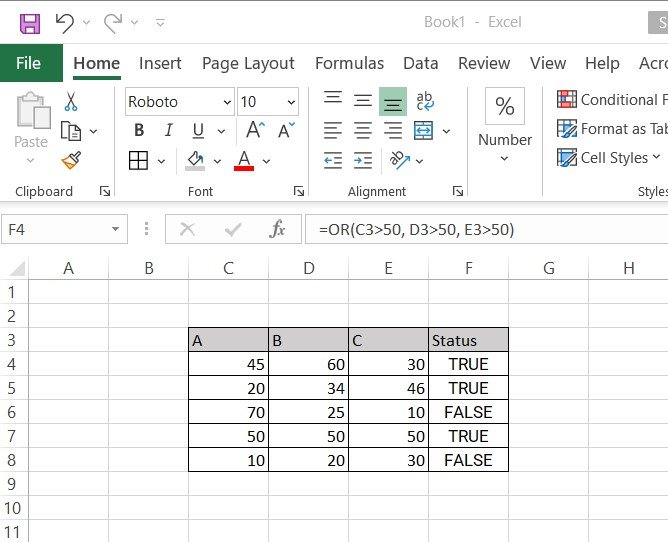
Example 01: Checking Value status
=OR(C3>50, D3>50, E3>50)
Returns TRUE if any of the values in cells A1, B1, or C1 is greater than 50; otherwise, returns FALSE.
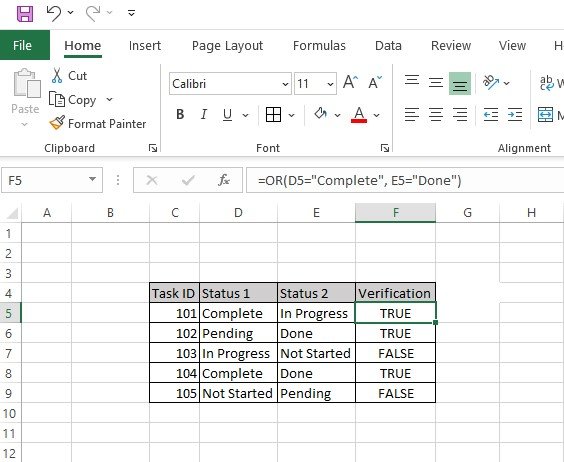
Example 02: Verifying Completion Status
=OR(D5=”Complete”, E5=”Done”)
Returns TRUE if either cell B2 contains “Complete” or cell C2 contains “Done”; returns FALSE if both conditions are not met.
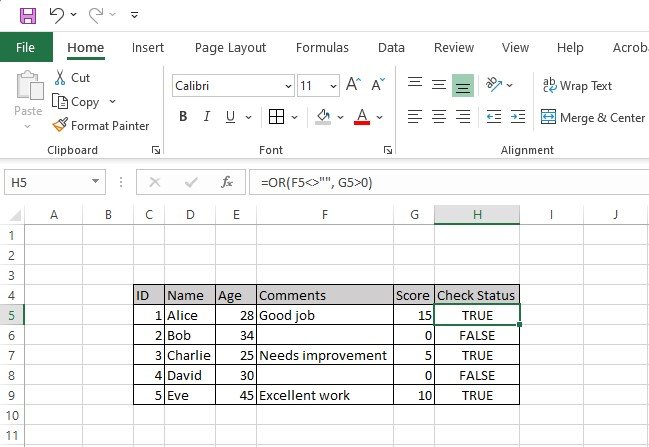
Example 03: Checking Multiple Conditions
=OR(F5<>”” , G5>0)
Returns TRUE if either cell D1 is not empty or cell E1 has a value greater than 0; returns FALSE if both conditions are false or empty.
Common Mistakes
Common Error
Incorrect Syntax:
Error: =OR(A1>10 B1=”Complete”)
Correction: Ensure proper comma separation between conditions.
Detail: The correct syntax separates each condition with a comma: =OR(A1>10, B1=”Complete”). Missing commas will result in a syntax error.Using Equal Sign Inside OR:
Error: =OR(A1=10, B1=”Complete”)
Correction: Use = within individual conditions, not within the OR function.
Detail: The equal sign should be used inside each condition to compare values, as in the provided example. Avoid using the equal sign outside individual conditions.Missing Cell References:
Error: =OR(>10, =”Complete”)
Correction: Include correct cell references in conditions.
Detail: Each condition should refer to a specific cell. For example: =OR(A1>10, B1=”Complete”). Omitting cell references will cause the function to fail.Exceeding Argument Limit:
Error: =OR(A1>10, B1=”Complete”, C1<5, D1=”Approved”, E1=”Valid”, F1=”Done”) (example with potential to exceed the limit)
Correction: The function allows up to 255 arguments; exceeding this limit will result in an error.
Detail: If you have more than 255 conditions, split them into multiple OR functions or simplify the logic. For example:=OR(OR(A1>10, B1=”Complete”, …, Z1=30), OR(AA1=”Yes”, AB1=”No”, …))
Nesting Errors:
Error: =OR(AND(A1>10, B1=”Complete”))
Correction: The function doesn’t require nesting with AND; use separate OR functions for different conditions.
Detail: OR and AND functions can be used separately. If you need to combine multiple conditions, structure them clearly:=OR(A1>10, B1=”Complete”) ‘ for one set of conditions
=OR(C1<5, D1=”Approved”) ‘ for another set
Avoid unnecessary nesting with AND unless combining results explicitly.
How to solve
Incorrect Syntax:
When using the OR, ensure that each condition is separated by commas. Incorrect syntax might look like this: =OR(A1=5 B1=10). The correct syntax is: =OR(A1=5, B1=10). Omitting commas between conditions will result in an error.Using Equal Sign Inside OR:
The equal sign (=) should be used within each condition, not inside the OR function itself. For example, =OR(A1=5, B1=”Yes”) is correct, while =OR(A1, B1=”Yes”)=5 is incorrect. Each condition needs to be a complete logical statement.Missing Cell References:
Ensure that each condition includes correct cell references. Incorrect cell references can cause the function to return wrong results or errors. For instance, =OR(A1=5, B2=10) ensures that the conditions check the values in cells A1 and B2 accurately.Exceeding Argument Limit:
The OR function can only handle up to 255 arguments. If you have more than 255 conditions, split them into multiple OR functions and combine their results. For example:=OR(OR(A1=5, B1=10, …, Z1=30), OR(AA1=35, AB1=40, …, AZ1=60))
Alternatively, reevaluate the logic to reduce the number of conditions.Nesting Errors:
The OR function does not require nesting with the AND function. Use separate OR functions for different conditions or restructure the logic to avoid unnecessary nesting. For example:=OR(A1=5, B1=10)
=OR(C1=”Yes”, D1=”No”)
Combining results might look like this:=AND(OR(A1=5, B1=10), OR(C1=”Yes”, D1=”No”))
How to Avoid
Double-Check Syntax: Ensure that each condition within a function is correctly separated by commas. For example, in this function: =OR(condition1, condition2, condition3). Misplacing or omitting commas can lead to errors in the formula.
Use Equal Sign Correctly: When writing conditions, use the equal sign within each individual condition. For instance =OR(A1=5, B1=10, C1= “Yes”). The equal sign should compare values within each condition, not in the function name or arguments.
Verify Cell References: Make sure the cell references used in your conditions are accurate and point to the correct cells. Incorrect references can lead to unexpected results or errors. For example,
=OR (A1=5, B1=10) checks cells A1 and B1 specifically.Manage Argument Limit: Spreadsheets like Excel have a limit of 255 arguments in a function. If you have many conditions, break them into multiple OR functions and combine their results if necessary. For example:
=OR(OR(condition1, condition2,…,condition255), OR(condition256, condition257,…))Understand Nesting Requirements: The function OR does not require nesting with the AND function for different conditions. Instead, use separate OR functions to evaluate distinct conditions. For example:
exce
=OR(condition1, condition2) =OR(condition3, condition4)
Understanding these points ensures that logical functions like OR are used effectively and efficiently in your spreadsheets.
Advance tips and Tricks:
Here are some advanced tips and tricks for effectively using the MATCH function in Excel:
Utilizing Nested OR Functions for Complex Conditions:
Tip: Employ nested OR functions to handle intricate logical scenarios by combining multiple conditions.
=OR(OR(condition1, condition2), condition3)
By nesting OR functions, you can create sophisticated logical structures to handle intricate scenarios, combining multiple conditions effectively. This technique allows for checking various combinations of criteria within a single function, enhancing the flexibility of your Excel formulas. For example, =OR(OR(A1>10, B1=”Complete”), C1<5) evaluates if either A1 is greater than 10, B1 equals “Complete”, or C1 is less than 5. This approach is ideal for accommodating complex and nuanced data analysis requirements.
Conditional Formatting with OR Function for Visual Alerts:
Tip: Apply conditional formatting using the OR function to highlight cells meeting multiple criteria, providing visual alerts.
=OR(condition1, condition2)
By integrating function into conditional formatting rules, you can highlight cells that meet any of multiple criteria, providing clear visual alerts. For instance, =OR(A1>100, A1=”overdue”) will highlight cells that are either greater than 100 or contain “Overdue.” This technique enhances data visualization, making it easier to identify patterns, trends, and outliers within your Excel sheets, thereby improving data analysis and interpretation.
Dynamic Range Selection with OR and OFFSET:
Tip: Combine OR with OFFSET for dynamic range selection, adapting your formulas to varying data sizes.
=SUM(OFFSET(start_range, 0, 0, ROWS(range), 1)*OR(condition1, condition2))
Using this function in conjunction with OFFSET enables dynamic range selection, allowing your formulas to adapt to varying data sizes. For example, =SUM(OFFSET(A1, 0, 0, ROWS(A1:A10), 1)*OR(A1:A10>10, B1:B10=”Approved”)) dynamically adjusts the range based on the number of rows in A1:A10 and sums values where either condition is true. This approach ensures accurate calculations even with variable-sized datasets, making your Excel models robust and scalable. It’s particularly useful for handling data that frequently changes in size, maintaining flexibility and accuracy in your analyses and reports.
Enhancing Data Validation with OR in Drop-down Lists:
Tip: Improve data validation by using the OR function in conjunction with drop-down lists to restrict entries based on multiple criteria.
=OR(A1=”Option1″, A1=”Option2″, A1=”Option3″)
By combining OR with data validation rules, you can create drop-down lists that accept only specific values, ensuring data integrity and accuracy. For example, using a custom formula like =OR(A1=”Option1″, A1=”Option2″, A1=”Option3″) in data validation restricts entries to “Option1,” “Option2,” or “Option3.” This approach streamlines data entry by guiding users to select valid options, reducing the likelihood of errors and maintaining consistency in your Excel workbooks. It simplifies the data entry process, making it more efficient and reliable, especially in shared or collaborative environments.
Frequently Asked Questions
01. What is the purpose of the OR function?
This function is used to evaluate multiple conditions simultaneously. It returns TRUE if at least one of the specified conditions is true, and FALSE if none are true.
02. How many conditions can I include in the OR function?
The OR function allows up to 255 conditions to be included within its arguments.
03. Can I nest OR functions within each other?
Yes, you can nest OR functions to handle more complex logical scenarios. For example, =OR(OR(condition1, condition2), condition3).
04. What happens if I exceed the 255-argument limit for the OR function?
Exceeding the 255-argument limit will result in an error. Consider restructuring your formula or breaking it into multiple OR functions.
05. How does the OR Function differ from the AND function?
The Function OR returns TRUE if at least one condition is true, while the AND function returns TRUE only if all specified conditions are true.
06. Can I use cell references as conditions in the OR?
Yes, you can use cell references, logical expressions, or a combination of both as conditions within the OR function.
07. What are some common mistakes to avoid when using the OR function?
Common mistakes include incorrect syntax (missing commas), using the equal sign incorrectly within conditions, missing or incorrect cell references, exceeding the argument limit, and unnecessary nesting with AND.
08. How can I visually highlight data based on OR conditions?
You can use the OR within conditional formatting rules to visually highlight cells meeting specific combinations of conditions.